First thing is to make sure you are modeling in a proper scale to your scene units (not display units). If you are set on meters, yet are only modeling something a few cm tall, you will run into this quite often. Zooming works at times, but to make it work better, make sure to hit Z first, this will reset your screen view, then zoom. You can also work in ortho view instead of perspective. If you don't have anything in the way, this works great as you won't zoom through any objects.
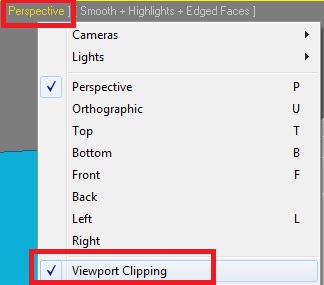
To adjust the clipping on your viewport: in the upper left part of your viewport, click on the Perspective text. A menu should appear, near the bottom is Viewport Clipping. Click that to turn on Viewport Clipping settings. Once on, you'll see a yellow line on the right hand of your screen. Near the top and bottom are triangles, these are sliders. If you slide the bottom one all the way down, it should remove the clipping you are running into. You will still get clipping at extremes, but it does solve most of those issues. These settings are also handy to clip stuff far away from you while you animate, so you can adjust the top one down until only stuff you are focused on is visible, this will help with playback speed.
The other thing you can do, instead of zooming in, is change the field of view. If you zoom, and it is so sensitive that it passes your object, change the field of view instead. Icon right next to the hand Pan button. Caution, this can get weird fast, and can reduce cursor accuracy if you go to far.
Source:
https://forums.autodesk.com/t5/3ds-max-modeling/beginner-adjusting-zoom-to-fit-selected-geometry/m-p/9193778#M32296
Viewport Clipping
The triangle slider at the bottom of the screen is for Near plane clip whilst the triangle slider at the top of the Viewport is for Far plane clip.
Source:
https://knowledge.autodesk.com/support/3ds-max/learn-explore/caas/sfdcarticles/sfdcarticles/Viewport-Clipping.html

Comments
Post a Comment